
Author Identification using Naive Bayes Algorithm — Deployment with Flask & Dockers
Written: 05 Jan 2021 by Vinayak Nayak 🏷 ["machine learning"]This is the final post in a three part series which demonstrates the process of building a simple ML model and deploying it to an API endpoint. Previously, we have seen how to scrape data from the web for building a dataset of dialogues narrated by the two characters Captain America and Iron Man. Subsequently we saw an expository overview of the Naive Bayes Algorithm and built a model (dictionary of conditional probabilities) to identify the author given a dialogue. You can refer this post for getting an overview of the model building phase.
As an ML practitioner, it is crucial to have the ability to deploy your work as an API or a web app so that people can use your model for inference. In this post, we’re going to deploy our model using Flask & Flasgger to an API endpoint, containerize it using Docker and deploy this app to Heroku. Let’s get started.
Firstly you’ll have to install two libraries namely Flask and Flasgger. This could be simply done with the help of pip package manager as follows
pip install Flask
pip install Flasgger
Flask is a micro-web framework written in python and Flasgger is a flask extension which can extract openAPI-specification from all flask views registered in our API. Using these two libraries we can build a fully functional user-friendly UI for exposing our model to the users. Let’s look at how we can achieve the same with the help of the following code
Firstly we import all the necessary libraries like Flask, Flasgger, pickle and the utils module which contains the helper function to predict the author given a dialogue. Next, we load the Naive Bayes model that we created in the previous post by unpickling it from the saved pickled file.
In Flask, we write code for endpoints using the @app.route decorator in which we specify the name of the route. In this app, we will have two routes; one will be the default home page and other will be the predict_dialogue route that will load our API for identification of author.
The home route does nothing but simply display a prompt for what this app can do. It returns a simple HTML string that gets rendered on the home page once the app is up and running as shown in the following snippet.

The code for this is defined in the home function attached to the @app.route(/) decorator. Next, we shall look at the meat of our application which is the predict_dialogue endpoint.
In our code, before we define the function for predict_dialogue, we have written an extensive documentation for the endpoint in terms of what it can do, what does it expect as input, what it outputs etc. This is what Flasgger looks at and when we go to the apidocs subdomain in the localhost, we are treated with a beautiful UI as follows.
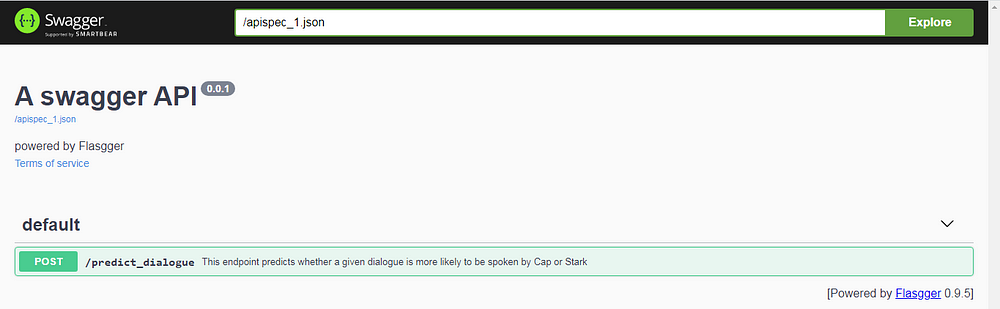
Since we only had one endpoint which accepts POST requests only, we have that view come up as one of the options to interact with. Notice that the name of the endpoint is picked from the decorator and the description comes from the first line of the function description for this endpoint. Next, if we click on the option for the POST request, we see the different arguments that this endpoint needs
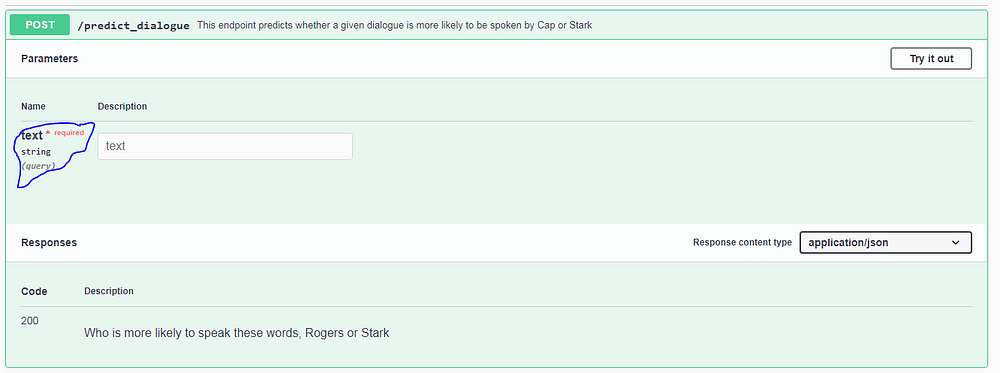
In our case we only need a single argument which is that of the dialogue text. We had specified in our function definition that the endpoint needs this argument and that it is a required field which shows up in red, that it’s name is text, it is a query parameter and it’s datatype should be string which is all visible as circled in blue.
Also, at the bottom we can see the different responses that could be returned by this endpoint; this one simply describes that the status code 200 is returned when the dialogue is successfully tagged with a narrator. This is also picked from the definition of the predict_dialogue function; the “responses:” section in the definition mentions all these codes and describes them.
The Try It Out button on the top right corner can be used for making a query to this API as follows:
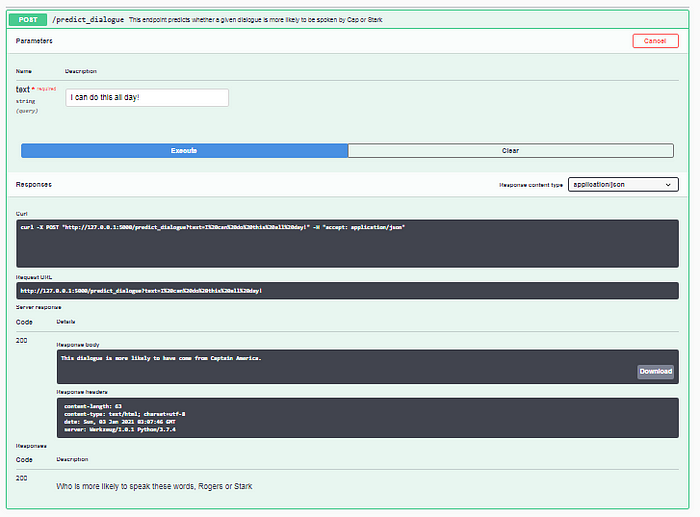
Once you click on the try it out button, you can enter different parameters required for the API and hit the execute button which runs the predict_dialogue function and returns the author predicted using the probabilities computed by Naive Bayes algorithm. This could be seen in the Response Body section which can also be downloaded on the go.
Now that we have the endpoint up and running, we can focus on how to containerize it using docker, but before that, let’s understand why we should use dockers in the first place.
Why Dockers?
Consider a scenario where you as a developer are working on your local system and build a web-application end to end or any application for that matter. Once you finish building and testing the same, you pass this on to the QA team for them to test this application but hell breaks loose and you get swarmed with tickets from QA team saying nothing is working, has it ever happened to you?
This is a very common scenario and most of the times it happens because the OS, hardware, dependencies etc. on the developer’s environment and the QA environment are not the same. Dockers helps deal with this problem and also provides some more possibilities which can come in very handy. These are as follows
-
Environment Standardization: Docker containers help bundle everything related to run a particular application together including a file system, network capabilities, hard disk space and RAM. This prevents the user of a developer’s application from the headache of setting up an environment like the developer which can be a painstaking process.
-
Isolation: This means that every docker container as a process is separate and gets it’s own set of memory, network capabilities and compute. Also unlike virtual machines, if a container is stopped, these resources are released and can be utilized by other already running container instances.
-
Portability: Once you build a docker image, you can distribute it to anyone on any system and be assured that if it runs on your system, it will run anywhere else i.e. you only need to build it once and deploy it anywhere and it will run for sure.
To build a docker you need to first have docker installed and running on your system. You can refer the official documentation page for installation here. I am working on an Ubuntu 18.04 version and could easily follow the steps from here for getting docker on my system.
Next we need to build a dockerfile which will have the instructions for building our docker image.
FROM continuumio/anaconda3:4.4.0
COPY . /usr/app
EXPOSE 5000
WORKDIR /usr/app
RUN pip install -r requirements.txt
CMD python inference.py
- We shall first obtain a base image from Dockerhub, here we select the anaconda base image which contains many default python packages with base python already installed. We selected anaconda3 which comes with python3.x preinstalled. We do this using the FROM command.
- Next we will create a folder appin the usr directory where we will copy all our application files. We do that with the COPY command.
- Since we have to host an endpoint, we need to provide a port for communication and we accomplish that with EXPOSE command and use port 5000, we can choose 8000, 8888 or any other available port.
- Next, we set the working directory to where we copied all the application files using the WORKDIR command.
- Once that’s done, we shall download all the dependencies needed for the application to work i.e. Flask, Flasgger, BeautifulSoup etc. which is mentioned in the requirements.txt file
- Finally we will run the command to start the application script using the CMD command.
We will keep this dockerfile in the same folder as our application files otherwise we will have to change the code in COPY command to properly transfer files from our local system to the docker container. Once this dockerfile is built, we need to build the docker which could be done using the following command
docker build -t rogers_stark_api .
Here rogers_stark_api is the name that I want to be associated with my docker image and I want to build it from the same path as the dockerfile hence the . Once you execute this command, it will pull the anaconda base image from Dockerhub, copy the files from the current directory to usr/app, install all the requirements using pip and expose the endpoint to port 5000 (the specified port). To make sure that the docker image is built successfully, type
docket images
on your command prompt/ terminal/ powershell and you should see that there’s an image called rogers_stark_api running on your system as follows.

Once the image is built, we can run the same by using the command
docker run rogers_stark_api

and our app will be hosted and we can use it. But not quite yet; because the IP address on which our app is hosted is not actually the one we specified in the inference.py file but that of the docker image. We need to find that out first and that could be done with the following command
docker ps
docker inspect CONTAINER_ID | grep '"IPAddress"' | head -n 1
The first command docker ps will show you the container id of the api image and then the following command will show you the IP address for that particular container. It is as follows

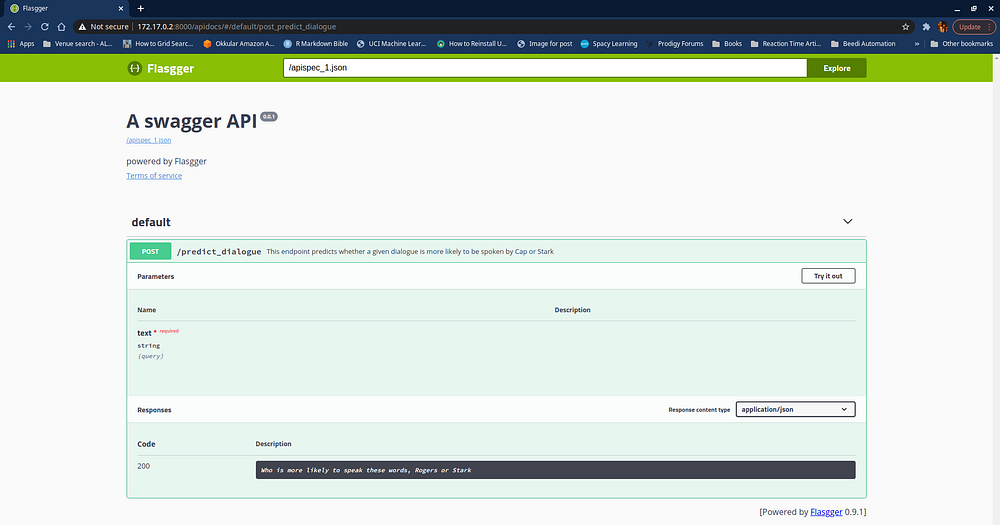
Now that you have the IP Address, you can go to the address 172.17.0.2:8000/apidocs and then you can see the following api up and running in your browser.
That marks the end of this series of posts. Hope you had as much fun learning and understanding from this series as much as I had writing it :)