
Using Python with VBA to automate Excel Workflows
Written: 10 Apr 2021 by Vinayak Nayak 🏷 ["miscellaneous", "excel"]Motivation
In this age of Data, python has become the most widely adopted language by many developers around the globe. This means that there are many potential libraries sitting there waiting to be utilized.
While python has recently gained the ethos for being the first choice to analyse data and has a very wide spectrum of applications spanning low to heavy usage for many tasks; Microsoft Excel has a history of, and in most cases still is an inevitable tool used to analyse/munge/visualize data.
Imagine if we could utilise the open-source libraries which are available in python for automating our workflows in Excel; It would make our lives super-convenient! Standing on the shoulders of the giant open-source python community which has thousands of packages for many different use-cases, we could utilize their functionality in Excel.
I had one such requirement which I would like to discuss below and with the help of xlwings I was able to integrate my Excel front-end with python backend through VBA and automate a substantially cumbersome manual process to happen at the click of a button!
This post is therefore mainly aimed at showing you how you could leverage this powerful python package called xlwings for communicating with Excel through VBA and in the process automate some tasks. There could be VBA workarounds for python code but for my particular usecase I wasn’t able to circumvent the need for python because VBA couldn’t do some tasks which a few python libraries like nsepy and bsedata were capable of doing.
The Problem
I maintain a sheet that I use to track my shares and how they’re performing at end of the day. For this, I need to fetch the closing price for every share that I have in my portfolio and manually enter it every day diligently. Any manual process is error-prone and I have fallen prey to this before where I had made a blunder in updating the closing prices of some shares and my calculations showed I was at a much riskier spot than I imagined; but when I cross-checked that was not the case and I realized I had incorrectly entered a 9 instead of 6 in the tens digit of a share. Those who use numpad on a keyboard would hopefully relate to this problem :p
Now, I came to know of this library called nsepy which is maintained by Swapnil Jariwala that helps fetch the data from NSE servers of all historical data related to any given equity/option listed on the NSE but the library was completely written in python. Only if I could somehow use the power of python in Excel it would be so awesome!
And that’s completely possible. There’s another python library called xlwings which particularly addresses this issue of excel integration with python and voila! Problem solved!!
To give you some background about the problem, here’s a sneak peek at a portion of the sheet which I have for keeping my share accounts.
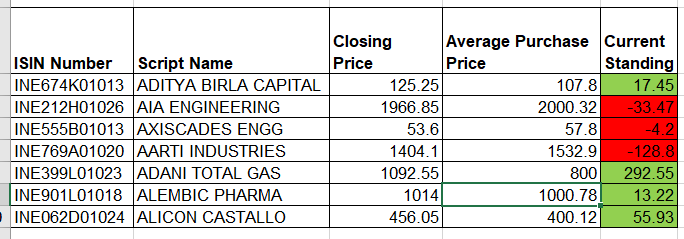
I have the ISIN Number of the script and it’s name, The average buy price which is referenced from other sheets within this same workbook, The Closing price which I used to enter manually at the end of the day and based on every script, what’s my current standing.
For the rest of the post, I will show you how I achieved this using xlwings’ vba integration using the nsepy library. By the end of this post, you should be able to build a project as below:
Setting up xlwings
Like any other package, you could simply install xlwings with the python package installer as follows
pip install xlwings
I recommend you create a virtual environment for this project to avoid conflict of dependencies in your already existing package installations. This post won’t cover it but you could look here if you want to install a virtual environment with pip or look here if you prefer conda like me.
Part of the pipeline is set i.e. the python pipeline. Next, you should install the part which is needed for excel integration with xlwings. For that, save and close all the excel workbooks which you have open for now and from the environment in which you installed xlwings, just run the following command
xlwings addin install
This should happen seamlessly but sometime, if you’re on a Windows 10 machine with Excel 2016, you may run into an error like below
xlwings 0.17.0
[Errno 2] No such file or directory: 'C:\\Users\\nayak\\AppData\\Roaming\\Microsoft\\Excel\\XLSTART\\xlwings.xlam'
This could be rectified simply by creation of the missing directory using a simple mkdir command
mkdir C:\Users\nayak\AppData\Roaming\Microsoft\Excel\XLSTART
After the succesful installation of xlwings, you will see when you open Excel next time, in the toolbar at the top a tab is created for xlwings. This tab also has the interpretor and python paths which are essential to specify in case you have a different virtual environment through which you want to execute the python functions.
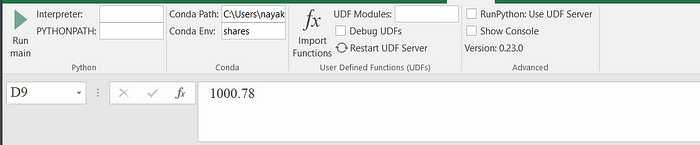
Since I use anaconda for maintaining my environments, I have provided the path to my Conda and the corresponding environment which I want to use. By default, xlwings will detect one environment (mostly the one in which you installed this library), but if in case it doesn’t, you’ll have to manually give the path to your anaconda distribution and the environment name.
To find where your anaconda distribution is, you could open anaconda prompt from Windows Start Menu and in that prompt, first activate the environment in which you have installed xlwings by running the command
conda activate your_env_name
and subsequently run the command
where python
This might bring up several results but you need to focus on the first one; Look at the first result in my environment shares below.

The path here is C:\\Users\nayak\Anaconda3\env\shares\python.exe, so in the Conda Path box goes C:\\Users\nayak\Anaconda3 and in the Conda Env box goes shares. This will help the macro calling the python udf understand which environment should it use to execute the python code in. If you’re not using anaconda distribution to manage your environments, you could do an equivalent exercise with your python environment where you give the path to the interpretor and the path to python instead of doing it in conda.
Next, you need to enable the user defined functions (UDF) for xlwings in the Excel interface. After opening Excel, navigate to the Add-Ins box by using Alt + L + H and then you will see a screen with multiple chekboxes asking you which addins you need enabled for this workbook. Click the box against xlwings and hit OK.
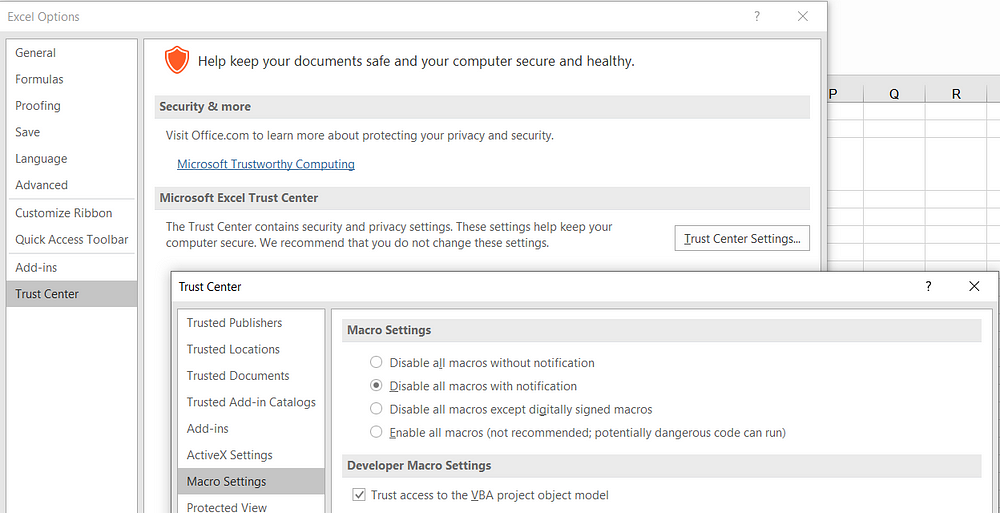
One last step which needs to be done after this is granting access all macros which want to use third party plugins like xlwings. You could do this by navigating to the File > Options > Trust Center Settings > Macro Settings and in macro settings, select Enable all Macros and below that in Developer Macro Settings, select Trust access to the VBA Project Object model.
With this we’re ready to again move to the python side of things.
Creating a project
You could quickly get started with a project by running the following command from the cmd prompt or terminal or shell
xlwings quickstart project_name
This will create a project with project_name as the folder name and by default you will get two files in this folder.
project_name.py: This is a python file which should contain the code which your macro could call to modify the worksheet.project_name.xlsm: This is a macro enabled excel file which is blank and contains two sheets namelySheet1and_xlwings.configfile. You could create additional sheets in this workbook and add any number of macros to it. The callbacks’ logic must be written inside of the python file that is created above.
What I did is I created a project and copied the contents of my excel file which had the info of the shares which I mentioned above into the xlsm file and renamed that sheet to my liking.
The python backend logic
Now comes the meat of the code which you need for automating your project. In this, you could access any cell from any sheet from the xlsm workbook above.
You can write any number of custom functions like in any other python script and use them here. I have written my code inside of the main function which I am going to use for updating the daily closing prices. I have given the code below in chunks for understanding purposes. You could look at the complete code at once here.
import xlwings as xw
wb = xw.Book.caller()
Since I am calling from within the workbook, I could use the above syntax and get the workbook object. If you want to get a reference to some other workbook, you could do
wb = xw.book(file_path)
Here file_path refers to the path where you have your excel file stored. Then to access any sheet, you can basically use index or the name of a sheet and to access the values from a range in a sheet you can chain the range command on top of it.
# Refer by index
DATE = wb.sheets[0].range("B1").value

# Refer by name
SHARE_NAME = wb.sheets["sheet_name"].range("C1").value
Once you get the ISIN code of a share and it’s name, nsepy can help you fetch the bhavcopy(price list) of all the shares listed on NSE and you could filter the closing price for that script on any given valid NSE date. nsepy is a library maintained by Swapnil Jariwala of which you could refer to the documentation here.
from nsepy.history import get_price_list

# Get the pricelist/bhavcopy for a given date and only keep the relevant info
price_list = get_price_list(DATE)
price_list = price_list[["SYMBOL", "CLOSE", "ISIN"]]

# An inline function to query the close price given a script name
get_close = lambda x: price_list[price_list.ISIN == x]["CLOSE"]

# Read the ISIN Code of our script name
ISIN = wb.sheets[sheet_name].range(f"A1").value
ISIN = ISIN.strip()

# Use the inline function above to get the close price of our share
close_price = get_close(ISIN)

# Copy the share price value to Excel
wb.sheets["sheet_name"].range(f"C1").value = float(close_price)
If you have multiple scripts, you could loop over this code to obtain the closing price for all of your scripts and write them to the Excel sheet as per your wish.
This is just a snippet of the actual code which could be found on my github repo for this project here.
The Excel FrontEnd Logic
Now that we have defined the python logic, we need to connect it to a macro and assign that to a button in our main sheet. To do that you need to first insert a button. You could go to Developer > Insert > Button and then drag a button down into the sheet.
Then you could hit Alt + F11 to bring up the VBA interface to define a macro. Now you could define a sub as follows in the same sheet where you have placed the button.
Sub CallUpdate()
    mymodule = "Python_File_Name_Here"
    RunPython ("import " & mymodule & ";" & mymodule & ".main()")
End Sub
This code in macro will do the following things:
- Find a file with the name “Python_File_Name_Here”
- Import the modules in this file
- Call the main function in the specified python file.
This code could be tweaked in many different ways; if you have another function apart from main and you want to call that, you can write RunPython ("import " & mymodule & ";" & mymodule & ".other_function_name()") and this will still work fine. You could do some checks in VBA, some in python and let the two interfaces communicate freely as and when needed, isn’t that wonderful!
Finally, to the button that you’ve created you can assign this macro by right-clicking on the button and going to assign macro option and eventually selecting this macro CallUpdate and clicking OK.
Now whenever you click the button (which I have named Update Close), the computations will run in the conda environment shares and the output will be updated in the excel sheet in column C. This way I don’t have to manually look up each and every share’s closing price on the web and then fill it in Excel, I could simply get it done at the click of a button!!
You could also define functions in python which could be called like formulas in Excel and do so many more things but I will cover that in a later post…
Conclusion
Hope this article helped you to understand how you can give wings to your excel workflows with the help of python :)