
Anime Face Recognition with deep learning - The Problem
Written: 02 Mar 2021 by Vinayak Nayak 🏷 ["deep learning"]Motivation
I have had been meaning to study an area of deep learning called metric learning and I figured out a great learning use-case that piqued my interest and made me delve straight into it. It’s the face recognition problem.
But wait, there’s a slight twist here. We’re not doing plain human facial recognition because it’s just meh, very commonplace!. As a proponent of the otaku culture, I thought let’s do facial recognition with anime characters!!
This would be a three post series which would talk about every aspect of the project right from problem definition to model evaluation and deployment. The three posts would be structured as follows:

- The first post i.e. this post will talk about the problem statement, collection of data and preprocessing/curating our images appropriately.
- The second post will talk about the model building and training part.
- Final post will cover the evaluation of our model where we tell the characters apart from one another and deploy the model using streamlit.
Without any further ado, let’s get started!
But what is Metric Learning?
Many Machine Learning problems usually fall under two buckets
- Classification — Where given a set of features (X), we need to produce a discrete output (y). eg. Telling if a given image is of a cat or a dog.
- Regression — Where given a set of features (X), we need to produce a continuous output (y). eg. Given the demographic information of people, predict how much money they make.
Although these two are some of the most common usecases, there’s other usecases one of which is called the retrieval task.
In this task, given a datapoint, we are supposed to find out other datapoints which are close to or away from this datapoint in some rigidly defined way. Face-identification, recommendation systems etc. are the class of problems which commonly come under the umbrella of this task.
Here an approach called similarity learning/ metric learning proves to be useful.
Wikipedia defines it as
Metric learning is the task of learning a distance function over objects.
It could also loosely be referred to as Similarity learning since the distance function could be used to rank objects from most similar to least similar or vice versa based on the end application. Here, using deep learning, a distance/similarity function like the Euclidean distance or Manhattan distance or even cosine similarity are used in the loss function to determine the extent to which two or more images are similar/different from one another.
In our problem of anime face identification, we will be using a loss function called Triplet Loss function and modifying it as mentioned in this paper.
Data Collection
Now, there’s no particular prescription here since this is a free-flow project, so I selected some characters from a few anime which I particularly like.
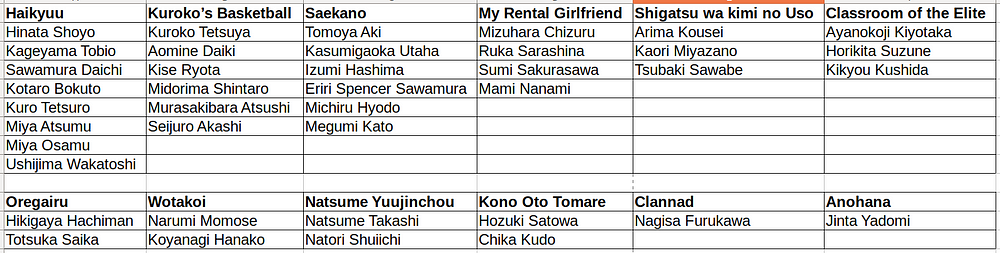
I have selected 40 characters’ and per character, we will have around 32 images making it a 1280 images dataset in it’s entirety. A character sprite (post collection) for all these characters can be seen below. I have meticuluously crafted this dataset to include images which include characters having some faces very similar to each other (eg. Natsume Takashi & Natori Shuiichi, Tomoya Aki & Arima Kousei etc.) to see how good a system we can build for telling people apart from one other.
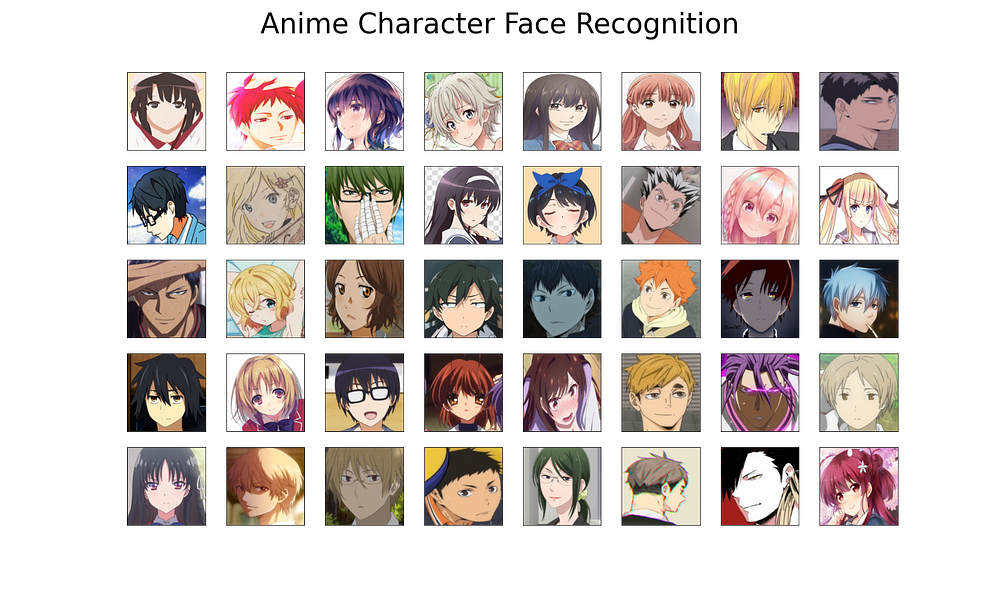
A list of all the characters above along with the anime that they belong to are as follows
Now that we have our characters and estimate figured out, let’s step into actually getting the data from the web.
Quality Data is the backbone of any predictive model. No model/algorithm can protect you from the perils of biases & other issues induced by compromised data. Collect your data wisely!
There are many search engines and sites from where we can manually download the data (only for purposes of training the model and not for resharing, redistribution, modification & resharing etc.) but that would take hours on end; it’s not an efficient process for data collection. Here’s where web-scrapers which are programs that crawl the web and scrape the data in an automated fashion could come in very handy. It is a very involved process and out of the scope of this post; For this post, we shall look at another popular package called google_images_download which could be used to scrape google images and save them locally.
Installation
You can simply pip install this library as it’s available on python package index (PyPI).
In your terminal/powershell/command prompt, create a virtual environment (optional, I have observed keeping environments separate can really help save potential dependency clashes in the future), and install the library as follows:
# https://pypi.org/project/google_images_download/
pip install google_images_download
Downloading Images
This library is really easy to use and well documented here. It provides a commandline option to download images as well as a script option where we can write our own python code and customize the downloads to happen in a particular manner.
We will use the script option to download the images for now. The script looks as follows
There’s primarily only two steps to download images as in the script above.
- Instantiate an object of googleimagesdownload class.
-
Define the arguments for downloading data. There’s many arguments that you can pass to customize your download process; some of them are
- keywords: The keywords which need to be looked for when doing a google image search.
- limit: How many images need to be downloaded
- print_urls: Whether to print the url of the downloaded image inline after every image download
- output_directory: Where to store the images to
Of these, only keywords and limit are mandatory, all others are optional. In case of no directory specified, the script creates a download folder in the same location as the directory from which the script is run and within it, a folder with the keywords name and stores the downloaded images therein.
Some troubleshooting tips while using this library
A couple of handful tips when using this library are as follows:
- If you are downloading more than 99 images, this script mode will not work. You will have to use the CLI to download images and download an appropriate web driver for scraping the images. You look at the version of your browser (Chrome) and from the official site, download the webdriver for the browser for that respective version and provide a path to through the CLI
googleimagesdownload --keywords "INSERT KEYWORD HERE" --limit NUMBER_OF_IMAGES --chromedriver PATH_TO_CHROMEDRIVER
For more info on the command above, look here.
Sometimes, you might need to download another dependency of webdriver_manager in order to get this library to work. This can be achieved by a simple pip install as follows.
pip install webdriver_manager
For more troubleshooting options, you can refer this website.
Preprocessing the images
Since we want to build a face recognition system, we are more interested in faces as against the entire character’s body. So, we would like to crop the entire image down to only include the faces of our characters. This is a crucial step because the models that we’ll build successively massively depend on the way we curate our data now.
There’s several different ways to do this, of which we’ll discuss two primarily. One is the usage of LBP Cascades to build a face detection system; in the initial days (pre-DL days), this or HAAR Cascades were widely adopted standards especially in our mobile phones and such.
Nagadomi has built an lbp cascade which many people have used in their projects and it is also known to work well in many cases. Let’s use it to crop our images and gauge it’s performance.
Installation
The repo is hosted on github and is available for use by one and all. Let’s get the codebase from there first.
Clone this repository or download the code as zip from here. After you cloned the repo/ or unzipped the contents of the repo, navigate to the folder and open a terminal/command prompt/powershell from this location. Next run the following command to get the xml file which hold the parameters needed for inference from the LBP Cascade.
wget https://raw.githubusercontent.com/nagadomi/lbpcascade_animeface/master/lbpcascade_animeface.xml
Next, install opencv library to your environment if you don’t have it installed. It could also be fetched from pypi with a simple pip install
pip install opencv-python
Now you’re ready to use nagadomi’s facial extraction cascade as follows.
To summarise the above code, we are basically reading in the image, converting it to grayscale and then we pass it through the lbp cascade and extract regions of interest i.e. faces; for every image, for every face extracted from that image, we save the image with the same name as the original filename only appending an index to it at the end for the faces generated. for eg. If our source image is Kuroko.jpg and it contains three figures of Kuroko Tetsuya, we save the resulting extractions as Kuroko_1.jpg, Kuroko_2.jpg and Kuroko_3.jpg respectively.
Results
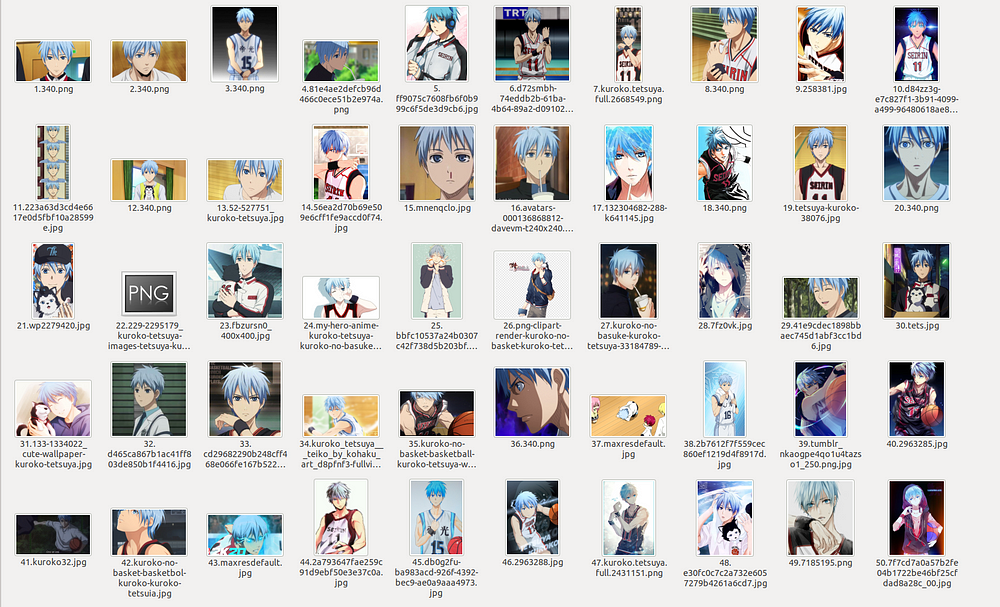
Although at a high level, these lbpcascades work fine, they don’t work pretty well for our use-case. For eg. let’s take the example of Kuroko Tetsuya’s image folder. I had initially extracted 50 images for every character and for Kuroko, this is how the snippet looks like.
When I used nagadomi’s face extractor, what I ended up getting is as follows:
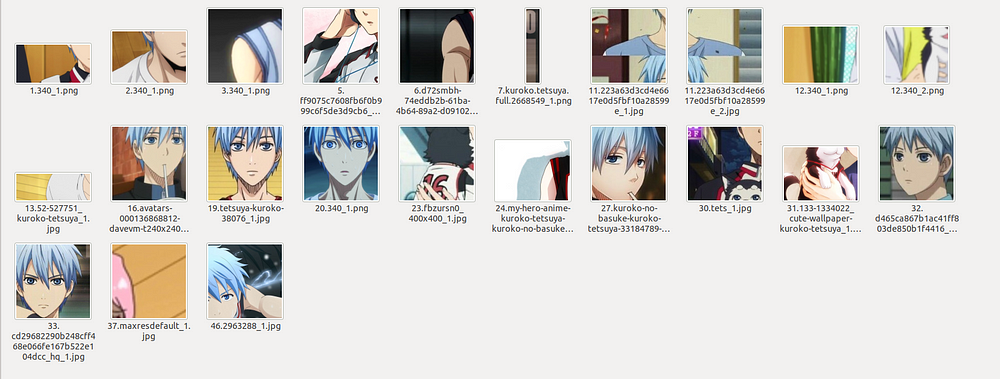
So from the above two pics, we can see that for some images, this technique fetches alright results but for most images, it’s not working very well. Such was the case for most of the characters across all the images. So, I took the aid of this cropping method to get facial images but I also went through other images manually to crop the faces of different characters. Despite this, there were a few characters for which, the 32 mark for number of images was not met (Mostly because the scraped data contained images which were figurines, keychains etc. for those characters and not the actual character images).
Balancing the data
After cropping the relevant images, we can see that across different characters, the number of images available are quite different and some characters’ images fall short of our pre-decided 32 images mark.
In such a case, we can go on and collect more data or simply replicate some images randomly across the available images per character and this can help mitigate the problem as well.
We define an N i.e. number of images per class that MUST, AT LEAST be present. Next, we iterate over the characters and for each character find out the deficit number of images if any. In case there exists some deficit of images, we randomly sample those many i.e. deficit number of images from our collected & cropped data and add the suffix _balancing to the image name to indicate this image is a duplicate created for the purpose of balancing the dataset.
Although this is a naive way of approaching class imbalance, it works wonders as compared to keeping the data imbalanced in the first place. We could also go for some augmentation technique like rotation, flipping, contrast/brightness change etc. to create another new distinct image as well. In this post, I have resorted to simply replicating the images as they are and that has worked alright for me.
Once we have these steps ready, we can move on to the next step which is actually training a deep learning model to perform the face identification procedure.
This is it for now, we shall cover the model training aspect in the subsequent post. Stay tuned for it! :)