
Datablocks API & Image Classification with fastai2
Written: 16 Sep 2020 by Vinayak Nayak 🏷 ["deep learning"]This post goes through describing the amazing datablocks API using fastai2 which makes it extremely convenient to curate and process data for the sake of model training.
So, without any further ado, let’s get straight into it. The topics covered in this post are as follows:
- Introduction
- The Task
- The fastai DataBlock API
- Training A Classification Model
- Interpreting A Classification Model
- References

Introduction
Image Classification has been a very common task since time immemorial however it wasn’t until Deep Learning that computers were proficient at doing this task. With the advent of Convolutional Neural Networks this task has become so good that in recent years computers have also beat humans in few classification applications. Building a model to do image classification (MNIST digit recognition) marks the start of the deep learning journey for many beginners. Let’s therefore do the same only let’s make it even more exciting by using a dataset curated on Kaggle called LEGO Minifigures classification.
fastai developed by Jeremy Howard and Sylvain Gugger is a library built on top of PyTorch for deep learning practitioners to ease the process of building/training and inferring from DL models. With relatively a very short code, you can build state of the art models for almost all tasks (classification, regression (on both structured & unstructured data), collaborative filtering etc.)using this library; that’s the amount of effort that has gone into making it. So let’s leverage it to our benefit and start with this task of image classification.
The Task
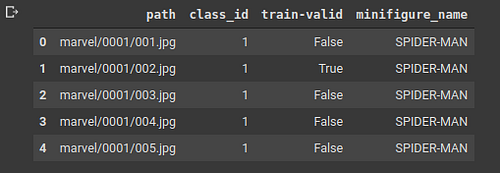
We have images of 27 different mini-figures built by Lego which are obtained from Kaggle here. We have to build a classifier which when given an image of a particular minifigure can tell which superhero/character it is. Let’s read in the dataset and have a look at few entries from the same.
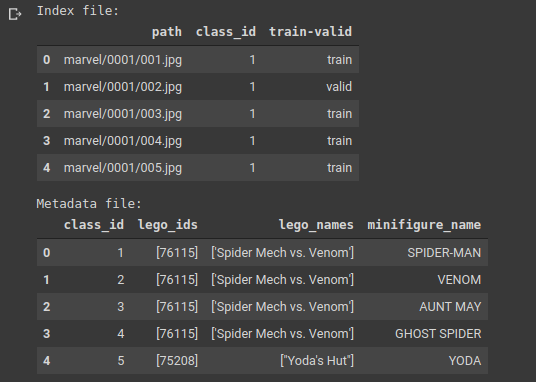
As we can see that the index file holds the information required to load the data that needs to be fed to the model and the metadata contains information about the different classes.
When we take a close look at the minifigures, it is observed that both class_id 1 and class_id 17 represent SPIDER-MAN. The SPIDER-MAN from class_id 17 is from a marvel superheroes collection and is therefore renamed accordingly to MARVEL SPIDER-MAN. Once that’s done, we can then join the index and metadata files on the class_id as primary key.
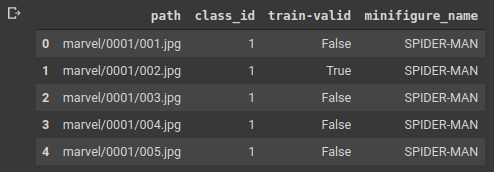
Also, the DataBlock API expects the column train-valid to be a column of boolean values which have a value true if the row belongs to validation set and false otherwise. Hence making that change as well and after completing all of this, the final dataframe is as shown below.
Let’s have a look at the number of images that we have in train and validation sets respectively. It’s generally good to have them in equal proportions and also they should both belong to the same population. Let’s see how the distribution of data looks like.
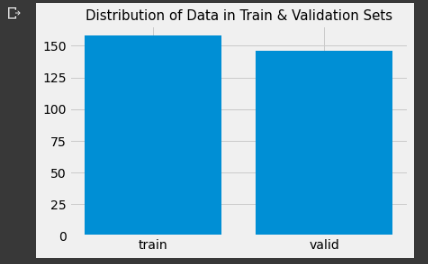
The dataset looks pretty much balanced with almost a hundred and fifty elements each in train and validation sets. Well, with respect to image standards, this number is pretty low for training a Neural Network classifier. Deep Neural Networks learn good representation functions when there’s a lot of images. A few hundreds or thousands of images per classification label is pretty normal with respect to normal deep learning standards. Over here we have a combined 300 odd images for 27 classes which means we have not more than 10–12 images per class. Let’s see how good a model we can build using this data.
The fastai DataBlock API
A substantial amount of time is consumed in curating the data in a format suitable to feed to the deep learning model in any application. To simplify this process so that any DL Practitioner can focus on the model building and interpretation more than data curation, fastai came up with the DataBlock API which is excellent at data curation.
Generally, data is structured in one of the following two ways
The Imagenet Directory Structure
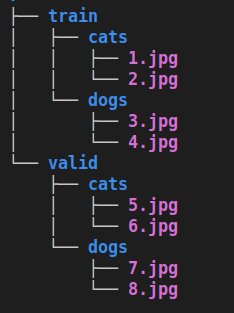
In this format, data is curated folderwise. There are separate folders for train and validation sets and each of them have folders corresponding to the respective classes that have the relevant data corresponding to those classes. The tree structure aside is for a cat-dog dataset curated in an Imagenet directory kind of style.
Wrapping info in a csv
In this method, the information about how the data is structured is wrapped in a csv. It has all information like the path to the data, class of the data, whether or not the item belongs to training or validation set and so forth. Our current dataset is curated in this particular format which we will leverage to create a datablock.
fastai’s datablock API provides support for both of these structures and even a few more however, we’ll look at the general structure of the API and how we can use the same for the sake of this problem.
The datablock API takes in several arguments some of which are compuslory and some are optional. We’ll go through each one of them sequentially.
- blocks: In order to specify the input and output. Here, we have an Image as an input and a category/label as output. Our output is a CategoryBlock but other outputs can be ImageBlock(for autoencoders), MultiCategoryBlock(for multi-label classification) etc.
- splitter: Jeremy always emphasizes the importance of a validation set in order to evaluate the performance of a model and rightly so! Without doing this, we’ll never truly now how well is our model performing. To do this, we can specify a RandomSplitter or a column in our case which specifies whether an entry belongs to training set or validation set.
- get_x: This argument asks for the location of the inputs i.e. ImageBlock here. In our dataframe, the first column i.e. path column contains the paths hence we’ve specified cols = 0. Also optionally we can add a prefix and suffix here using pref and suff arguments. Since we have relative path of images, to get absolute path, prefixes are needed. In csvs, sometimes the extensions of items in the path columns are dropped which is where suffix argument comes in handy.
- get_y: This argument asks for the output values. In the dataframe, since the 4th column i.e. minifigure_name is the label we’d like to predict, we specified cols = 3 in the ColReader object to the get_y argument.
- item_tfms: Before making a batch of items for the neural network to train, we need to apply some transforms to ensure that they’re all the same size (generally square) and in certain other cases, some other transforms as well. These are mentioned in this argument.
- batch_tfms: These are the augmentation methods which you wish to use for making the model learn general features by cropping, zooming, perspective warping and other such transformations. You can choose to ignore this argument if you already have a large dataset size with a significant variety of images but otherwise, it always helps to add transforms to learn generalised models rather than over-fitted ones.
Once we have the DataBlock API object, we can create dataloaders using this object which can be fed into the model for training. After creating a dataloader, we can see how data is input to the model using show_batch method and subsequently the vocab attribute can be used to see what and how many classes/labels are present in the dataset as a whole.
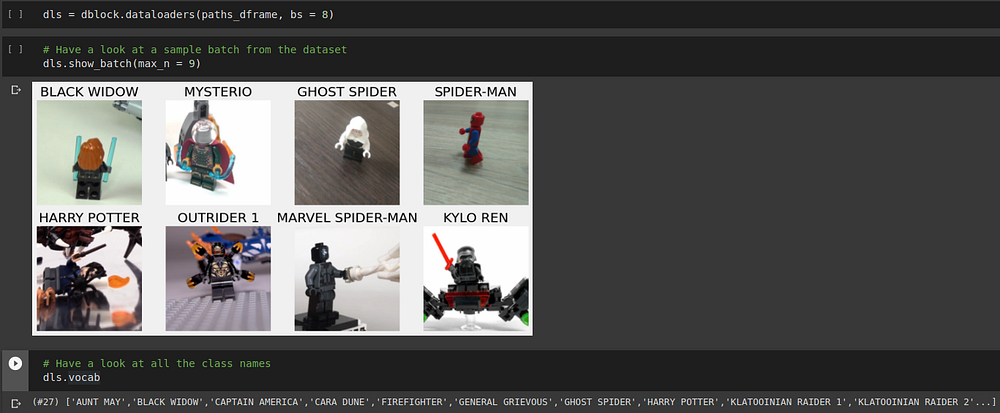
The dataloaders object contains both the train and validation dataloaders in it. The items in vocab correspond to the classes pertaining to train dataloader and the validation dataloader may have less than or equal number of labels/classes as the train dataloader. Also, notice that in the show_batch method, you can provide the number of items that you want to see but if the number is bigger than batch size (9 as opposed to a bs of 8), then you’ll only see as many images as in the batch size.
Training A Classification Model
Once you have a dataloader, next step is to create a model and to train it with an appropriate optimisation algorithm. fastai already abstracts a lot of these things and provides you with a very simple learner object which also has a lot of arguments but let me stress on the most important ones below.

The compulsory arguments that our Learner object takes are as follows:
- dls: The dataloader object which we defined using the DataBlocks API above. It contains train and validation datasets and their labels.
- model: This is the model architecture that you would like to use. Since we’re doing transfer learning, we will be using a predefined resnet101 model trained on ImageNet weights. But, if you want you can build your own PyTorch model by inheriting the nn.Module class and implementing it’s forward method; that is beyond the scope of this article, so we wouldn’t discuss it here.
- loss_func: Also known as the objective/cost function, this is the function based which the optimization algorithm is trying to minimize (well in most cases; unless you define an objective to maximize). For classification, CrossEntropy Loss and for regression MSE Loss are the most commonly used loss functions.
Other optional but important arguments are opt_func which specifies the optimisation algorithm to be used for training the model and metrics which specify what metrics to gauge the performance on (it could be accuracy, precision, recall, any custom metric). Also there is a capability of calling different callbacks as well which is not in the scope of this article. You can refer here to understand more about the same.
Once we have the learner object, we can utilize the lr_find function to find an optimal learning rate for our model. Looking at the loss vs learning rate profile, we should select the learning rate where the loss is minimum or a rate slightly below that point. It’s good to be conservative with learning rates because in my personal opinion, delayed convergence is more tolerable than overshooting the optimal point.
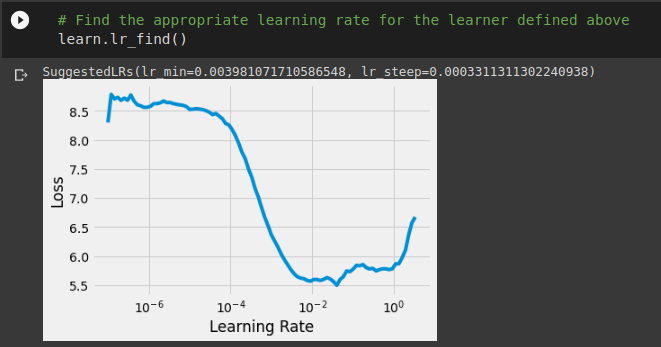
The function also gives suggestions for lr_min and the point where the steepest descent in loss was observed. The lr_min is an estimate of the minimum learning rate that one should pick in order to see decent speed of training without being extremely wary of skipping the optimal point in the loss surface while simultaneously ensuring that the model is learning something and parameter updates are happening. So, let’s for this case pick a learning rate of .01 and start the training.
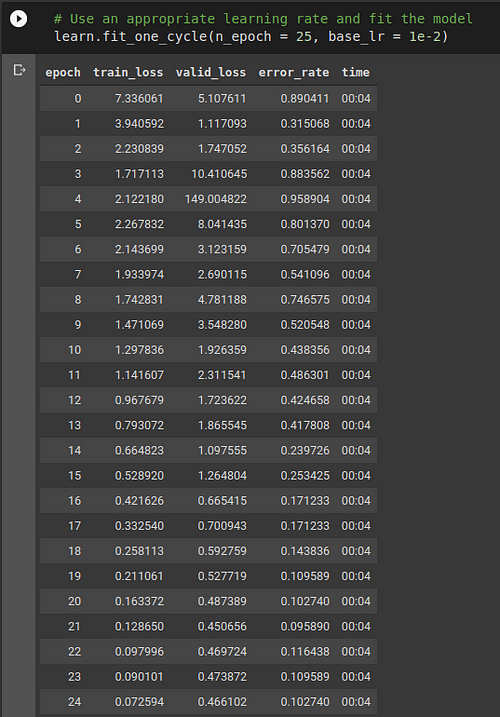
Since we have only about 154 training images, each epoch takes around 4 seconds with validation and metric computation. In this case, for resnet101 pretrained model, it’s top fc layers and a few penultimate convolution layers are getting the weight updates and the rest of the network is frozen i.e. weight updates don’t propagate further backwards than that. This fine-tuning approach has empirically observed to be the best when adopting a pre-trained model for a custom task; however after substantial improvement, like when the error rate drops to 10% or accuracy reaches almost 90%, we can also unfreeze that portion of the network and again train the model with the parameter updates now penetrating throughout the neural network.

That’s exactly what we did here. After training for 25 epochs, we unfreezed the model and checked for a good learning rate with the help of lr_find and ran the training loop for 5 more epochs. However we couldn’t find any substantial improvement in the error rate. It went down to 8.9% from 10.27%; this shows that the model is now saturated and no matter what you do to the model unless you provide new data, there wouldn’t be any major impact on the accuracy of this model.
In order to save this model for interpretation in future, you can simply use the command
learn.export("filename.pkl")
This will save the model with the name filename as a pkl file that could be later reloaded for inference. Now that we’re through with all the training part, let’s interpret the model and look at the predictions that it has made.
Interpreting A Classification Model
After building a model, the performance of the model needs to gauged to ensure it’s usability and fastai provides a class ClassificationInterpretation for the same. We can create an instance of this class with the learner object that we fit in the training part.
Once we do that, we can observe the confusion matrix for validation data to see where the mistakes were made and how many of them were there.
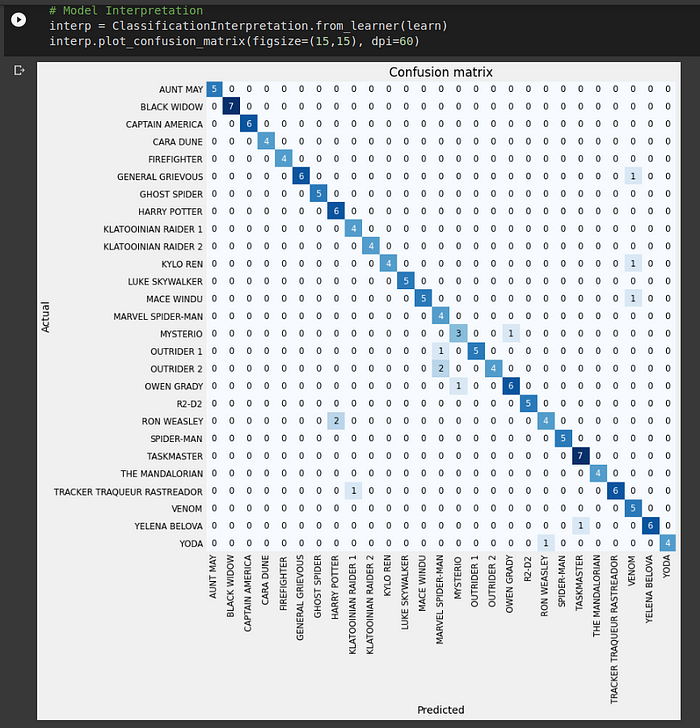
The overall structure of this seems good. In an idea case the diagonal is completely saturated with all the other non-diagonal elements being null. Here we can see that’s not the case. This means that our model has misclassified some action figures for eg. 2 RON WEASLY Legos were incorrectly classified as HARRY POTTER, a YODA figure was misclassified as RON WEASLEY and so on. In order to particularly highlight the ones which are misclassified, the ClassificationInterpretation class also has one more method.
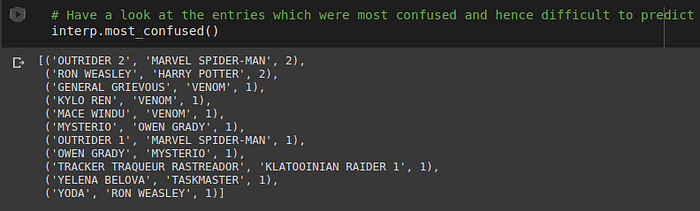
Here we can see tuples of misclassified items. Each tuple is structured as (Ground Truth, Prediction, number of misclassifications) respectively. Optionally you can also provide a parameter which looks at only those pairs which were misclassified above a certain threshold number of times. This can help us identify the pairs which need to be focussed more on. Thereby we can make decisions like adding more data or deleting wrongly labelled data and so on.
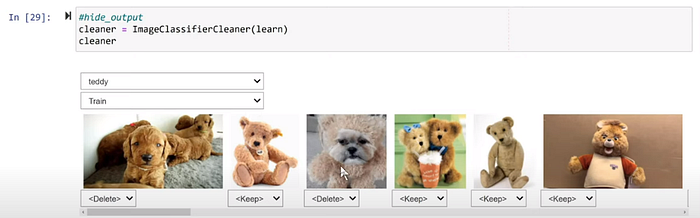
Although in my application everything is neatly labelled, there can be instances of mislabelling like below. The above code helps to create a GUI inline in the notebook which can be used to basically keep/delete/move items from one class to another. This is present in the widgets class in the fastai.vision package. If you’re sometime not sure about the labelling in your dataset, auditing your dataset like this is worth a try to clean it.
So that’s it for this post guys; I hope you understood the steps to start using fastai for making your own image classifier. It has saved me a lot of time in terms of data preprocessing, model training and model interpretation, particularly in deep learning. Unlike PyTorch where we have to define the Datasets and Dataloader, the datablock API obviates the need for that step as it nicely wraps everything into one function call. Hope you liked the article and thanks for reading through!