
Beginners guide to pymongo for referencing mongoDB NoSQL database with python
Written: 10 Oct 2020 by Vinayak Nayak 🏷 ["basics"]This post aims to explain how can pymongo be used in order to interface with mongoDB to perform CRUD operations. In order to follow through this post, it’s recommended but not compulsory if you have a basic working knowledge of mongoDB and what it is. The topics covered in this post are as follows
- Introduction
- Configuring a client in pymongo
- Creating database, collections, documents
- Querying documents from collection
- Updating documents in a collection
- Deleting documents from a collection
- Deleting databases, collections from a mongo server
- References
Introduction
MongoDB is a NoSQL (Not only SQL) database which is one of the most widely used databases. It’s natively written in C++ which makes it quite fast and efficient while performing CRUD applications.
To be specific, MongoDB is a document database in which records or entries are stored as documents in a key-value format, very similar to how json or python dictionaries are; thereby allowing the use of object notation to retrieve data from the database.
One of the plus points of using mongoDB is that being a NoSQL database, one isn’t constrained by the type of data that could be stored in the database as long as it follows a key-value pair. In SQL, there’s a very strict schema that every record has to adhere to making it very rigid whereas MongoDB allows full flexibility in that aspect. In some applications, we don’t know ahead of time what & how much data would come and yet need to store it to the database; mongoDB is the way to go about tackling such use cases.
A comparative analysis of terminologies involved in mongoDB and SQL can give a better understanding of the mongoDB service for storing data; this is as follows:
- Database is a group of data which is stored on the server; it is referred to as database in both mongoDB and SQL.
- A database is made up of quantum of smaller groups called collections in mongoDB or table in SQL.
- A row in SQL consists of records or rows holding data of certain datatypes which is also referred to as document in mongoDB.
- A column in SQL consists of a feature which can hold data of a certain datatype; this is referred to as a field in mongoDB. The key difference is that in mongoDB, fields across documents could be different whereas for a SQL table, the columns must be the same for all rows.
In order to gain more familiarity with mongoDB in particular, I would recommend you to check out this GitHub repository which explains how to get started with the same.
pymongo is a package in python which helps us to configure with a mongoDB database and retrieve documents from the same. Since for any data related work, python has a ton of support for processing, modelling, wrangling any sort of data, it makes sense to store data in a database like mongoDB and use python for retrieving it on demand and pymongo facilitates this usecase with quite an ease. To install pymongo on your system, you’ll need to have python and pip locally installed on your system; you can follow this tutorial to get the same. Once you have them installed, just run the following command from your terminal or command prompt and you’ll be good to follow through the rest of this post.
pip install pymongo
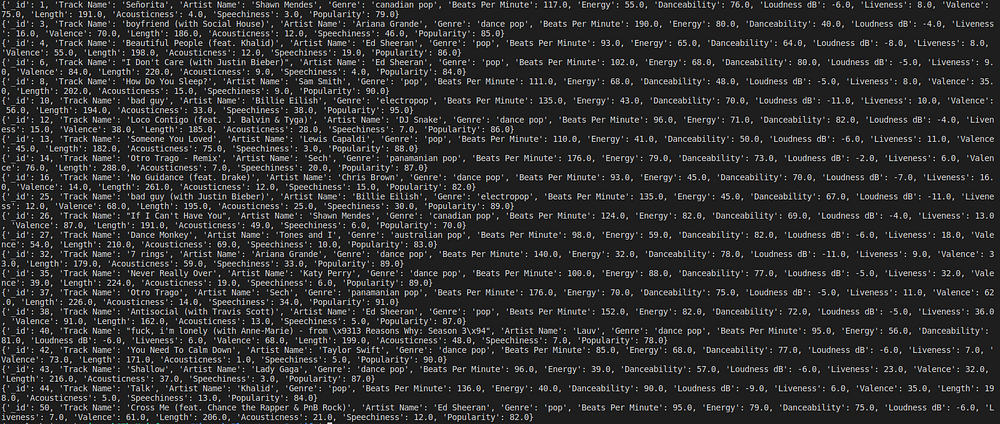
The data we’re using here consists of the top 50 songs according to spotify for the year 2019; a sneak peek in the dataset is as follows:

The dataset consists of the track name and certain related fields like who sung it, what genre is it and other quantitative parameters like how popular it was, how long the song is in seconds etc. For a deep dive into the dataset visit kaggle here to know about the other parameters, what tasks could be carried out with this dataset and so on. We will be creating a simple scenario to demonstrate CRUD (Create, Read, Update Delete) functionality in mongoDB using this dataset.
Configuring a client in pymongo
Once you got python, pymongo and mongoDB installed on your system, you can open a python script and start coding.
The first thing that you’ll need to do is create a connection to your mongoDB server. After installing mongoDB, most systems dedicate the port 27017 on the localhost to host a mongoDB server, if you/your organization have a dedicated server, make sure to get the link to your server and create a connection as follows.
from pymongo import MongoClient

# Create a mongo connection
client = MongoClient("mongodb://localhost:27017/")
Once you have this connection you can use the client object in order to perform any CRUD operation, we’ll see in the following sections.
Creating database, collections, documents
Using the collection object above, we look at the existing databases, the collections and documents contained in them and also create new databases. Let’s first look at how we can peek at the existing databases and collections.
# Have a look at all the databases in the client connection
print(client.list_database_names())

# Have a look at all the collection names in all the databases in client connection
for item in client.list_database_names():
    tempDB = client[item]
    print(f'Database: {item:<20}, Collections: {tempDB.list_collection_names()}')

If you have only installed mongoDB recently, these three databases are created by default and no other database is there since we haven’t created one yet. Let’s create a database called spotifyData and in it, let’s have a collection named Top50. We can do it as follows
Now, there’s a catch here. Please note that databases and collections are created lazily in MongoDB. Lazily as in the collections and databases are created only when the first document is inserted into them. So, as of now we have pointers to a database and a collection object but they’re not created yet. Let’s insert the documents from the spotify top 50 songs of 2019 dataset into the Top50 collection.
# spotifyTop50 is a list of dictionaries containing every row in the table of top 50 songs
# Create a single document in the collection
one_document = spotifyTop50[0]
coll.insert_one(one_document)

# Create many documents in the collection (excluding first one since it's already created)
all_records = spotifyTop50[1:]
coll.insert_many(all_records)
There are two primary methods which are used for creating documents inside of a mongoDB collection. When you have one document, you can use the insert_one method to create a document in the collection. When you have a fleet of documents all present in one list, you can use the insert_many method to create all those documents in the collection.
These documents are basically dictionaries in python which have fields as the keys and values are the data. A sample document in this example is as follows:
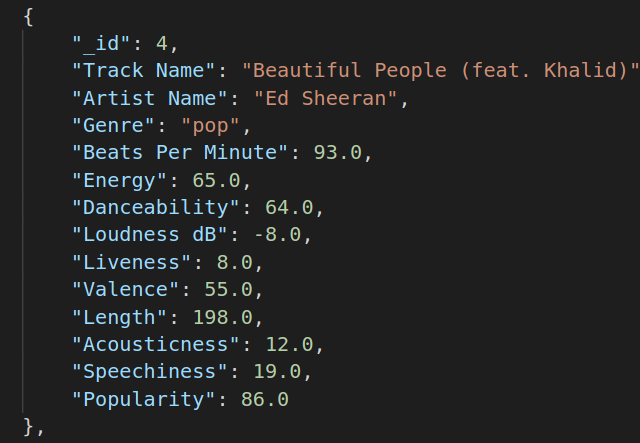
The _id field is an important field when it comes to mongoDB. It could be thought of similar to the primary key in SQL. It is a unique identifier for every single document. No collection can have two documents with same _id. If you don’t provide an _id field explicitly, mongoDB will generate one on it’s own which is a random string Object not matching the _id of any other Object.
Querying documents from collection
Next comes reading or querying from the mongoDB collections. Once we have created a database and a collection to hold our top 50 songs, we can use it to find out any record by imposing constraints on different fields giving us the ability to filter only required data from our collection.
Let’s say we wanted to see all the Taylor Swift songs which made it to the top 50 songs of 2019, we could execute our query as follows.
# Find all the documents sung by Taylor Swift
taySwiftrecs = coll.find({"Artist Name": "Taylor Swift"})
for recs in taySwiftrecs:
    print(recs)

We can see that only one song of Taylor Swift made it to the top 50 list in 2019 which is title “You need to calm down”.
Please not that the find method as shown in the code snippet above, without any constraints will look up and return all available documents in the collection. Only when we specify some constraints will it return filtered data.
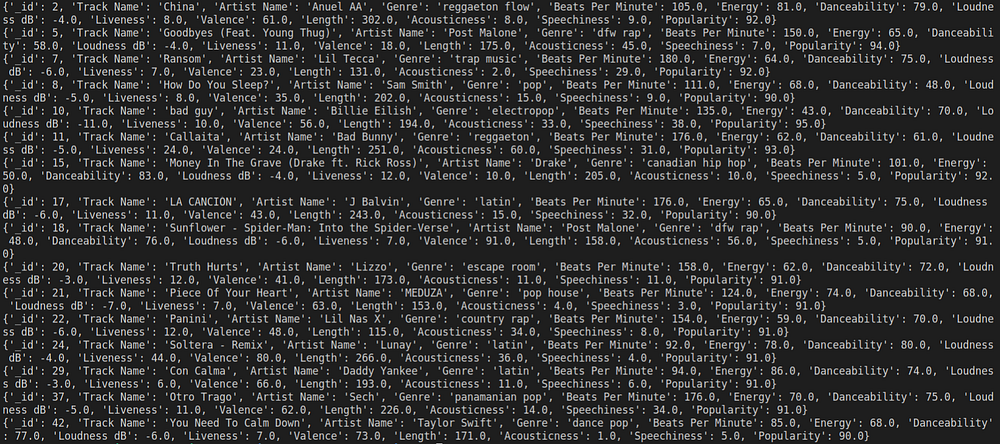
Let’s say we wanted to find out all the songs which had a popularity of 90 or more. We could do it with the following query.
# Find all the documents which are highly popular (popularity > 90)
pop90recs = coll.find({"Popularity": {"$gte": 90}})
for recs in pop90recs:
    print(recs)
Let’s say we wanted to find out which songs were from the pop genre and query all of them. Now, in the documents, we have many different pop songs prepended by adjectives to describe these sub genres. So we’ll use a regular expression for filtering the documents as below.
# Find all the documents which belong to the pop genre
popSongs = coll.find({"Genre": {"$regex": "pop$"}})
for recs in popSongs:
    print(recs)
So, in this section we saw how we can query data from mongoDB using pymongo’s find function. It provides some good tools for extracting data based on both numeric and string related constraints as we saw in the examples above. Let’s see how we can update data in documents in mongo collections using pymongo.
Updating documents in a collection
Let’s say we have some data in our collection and we wanted to update one or many fields in one or more documents. It is possible to do so using update_one and update_many functions in pymongo. We will look at the update_many function since the former is anyways a special case of the latter.
In most of the reviews/feedbacks we see that things are rated on a scale of 1 to 5. However here, we see that the popularity is reviewed on a percentage scale. Let’s say we wanted to update it such that popularity is constrained between 1–5 only. This could be done by dividing the popularity field of each and every document by 20 (i.e. multiplying by 0.05). Here’s how we could do it using pymongo.
# Update popularity
allSongs = coll.update_many(# Filtering criterion
                            {},
                            # Update criterion
                            {"$mul": {"Popularity": 0.05}})
Since we want to update all the documents we passed an empty filtering criterion, otherwise if we only want to update a specific set of documents, we could do that as well. Let’s say we wanted to replace all Ed Sheeran Songs to have the name Teddy (his colloquial nickname). That could be done by adding a filtering criterion like this.
result = coll.update_many({"Artist Name": "Ed Sheeran"},
                          {"$set": {"Artist Name": "Teddy"}},
                          upsert = False)

print(f"Matched: {result.matched_count}, Modified: {result.modified_count}")

We can see that there were 4 songs by Ed Sheeran in the year 2019 which is quite a lot for a single artist honestly; but all of them were modified to reflect the artist name as teddy. The argument upsert is an interesting one. It basically creates a document if the filtering condition doesn’t match any documents and sets the artist name to teddy if upsert is set to True.
Deleting documents from a collection
Let’s say we wanted to delete the songs sung by Drake which are there in top 50 songs of 2019 (Nothing against him, just for the sake of demo), we can use the delete_one or delete_many methods. Since we want to delete all songs, we can use the command delete_many as follows.
# Delete all the songs sung by Drake from the collection
result = coll.delete_many({"Artist Name": "Drake"})
print(f"Deleted: {result.deleted_count}")
Looks like there was only one song by Drake that made it to top 50 so in this case delete_one and delete_many would have had the same end result. Let’s try deleting all the documents which had a popularity of 80 or below (i.e. 4 or less in the new scaled system).
# Delete all the songs having popularity less than 4
result = coll.delete_many({"Popularity": {"$lt": 4.0}})
print(f"Deleted: {result.deleted_count}")
There were three songs which had a popularity of less than 80 or 4 (in new scale).
Deleting databases, collections from a mongo server
Let’s say we don’t need a particular collection from a database in mongoDB and we want to delete it. It could happen at any point of time because data no longer needs to be accessed by anyone, the data is outdated and has no use or any other reason. Since we have only one collection in our database, it doesn’t make sense to delete it now, but only for sake of demonstration, here’s how we can do it.
# Drop collection with reference
coll.drop()
# Drop collection from database with name
db.drop_collection("Top50")
Similarly if we want to drop a database, we can use the client variable which holds connection to the mongo server and delete the database.
# Drop database from a mongodb server
client.drop_database("spotifyData")
It’s always a good practise to explicitly close the connection which you’ve established for the sake of interacting with mongodb server. You could do it simply by using the command
client.close()
This brings us to the end of this post. I hope you have got a good starting point for using pymongo to interact with mongoDB programatically through scripts. If you want to look at the code for this post all at one place or dive deeper or prefer the video medium for tutorials, please look at the references section below.